Disclosure: This post may include affiliate links through the Amazon affiliate program or other affiliate partnerships. If you click on a link and buy something, I may receive a commission, at no additional cost to you. You can read more boring disclosure details in my disclosure and privacy policy.
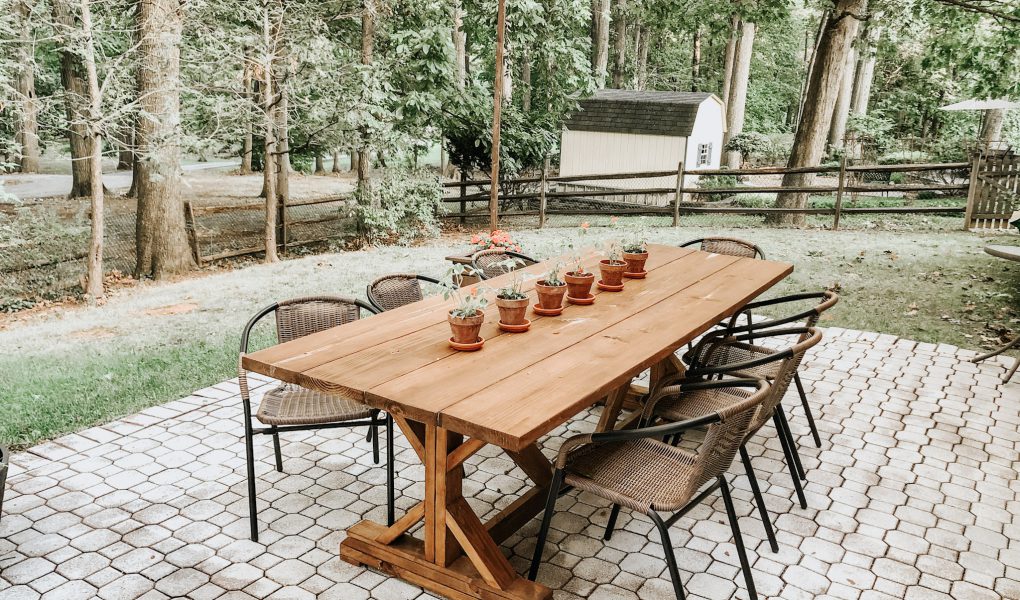
Whitewashing your outdated brick paver patio is a simple DIY project that can completely transform your space in just one weekend and for less than $60. This DIY whitewashed patio tutorial will walk you through every step!
Like most DIY projects in our home, this one began with me thinking about how much it would cost to change a part of our home that needed some TLC and modernization.
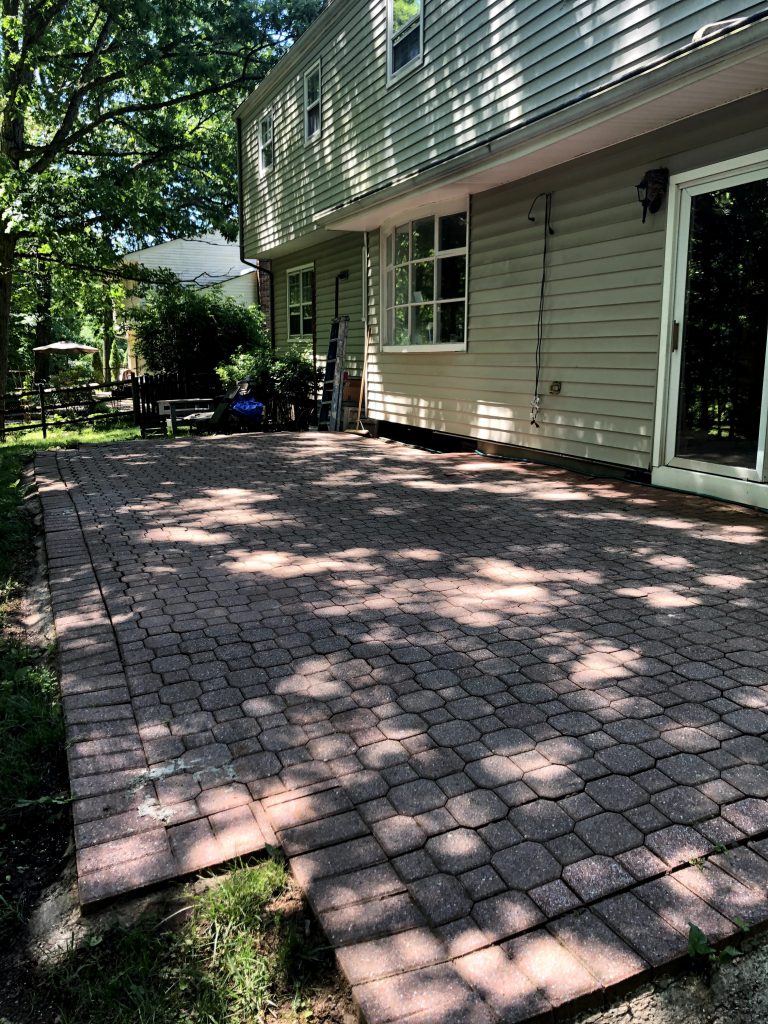
In this case, it was the brick paver patio. This style patio is outdated, and I don’t believe it was installed correctly to begin with because it is unlevel with sunken spots throughout.
We had a landscaping company give us a quote on installing a new patio. We were quoted at $20 per square foot, including labor and materials. With the size of our patio, that put the cost at over $10,000. Ouch. Yet another moment as new homeowners where we were blindsided by how much things cost.
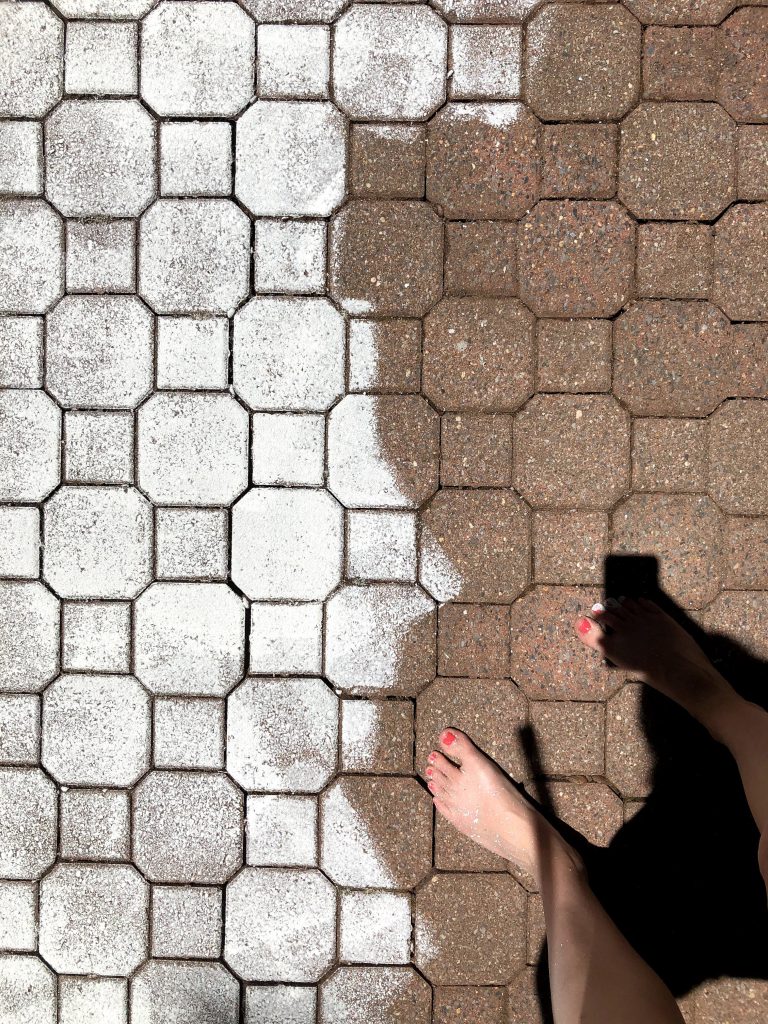
Since a new patio was out of the picture, it was going to take a bit of creativity to make it feel different and updated. I figured if I could change the color of the pavers somehow, then it would feel almost like we had new stones entirely.
There are several products you can use to restore or dye the color of your brick pavers. However, this only made them feel darker, or even more red and brickish. In my searches for dying bricks, I found several whitewashing tutorials for indoor fireplaces, or two for exterior walls.
So, I thought to myself, “If you can whitewash an exterior brick wall, why can’t you whitewash exterior brick that’s on the ground?“
And that’s exactly what we did!
For other backyard DIY projects, check out:
DIY Outdoor Farmhouse Table
DIY String Light Posts and Planters
DIY Outdoor Couch Makeover
Disclaimer
Before you follow this tutorial, let’s lay out a few disclaimers.
First, keep in mind that brick is porous, so painting brick is permanent. If you think there is any chance that you might not like it after whitewashing, don’t do it. Only follow this tutorial if you are super excited about it and are going to commit to loving the new look. I recommend testing on a spare paver or an inconspicuous part of your patio.
Second, the final color will vary depending on what your original paver color is. It might not look exactly like mine.
Finally, I can’t guarantee how long the paint will last. I will update this post as time goes by, but obviously I didn’t paint our patio and then wait 5 years to see if the paint washed off before writing this post. However, painting only took me 2-3 hours, so even if it fades a lot in two years, I still think it’s worth it and would paint again.
Step 1: Cleaning the Pavers
First, check the weather! You need a 3-day block at least without rain in the forecast.
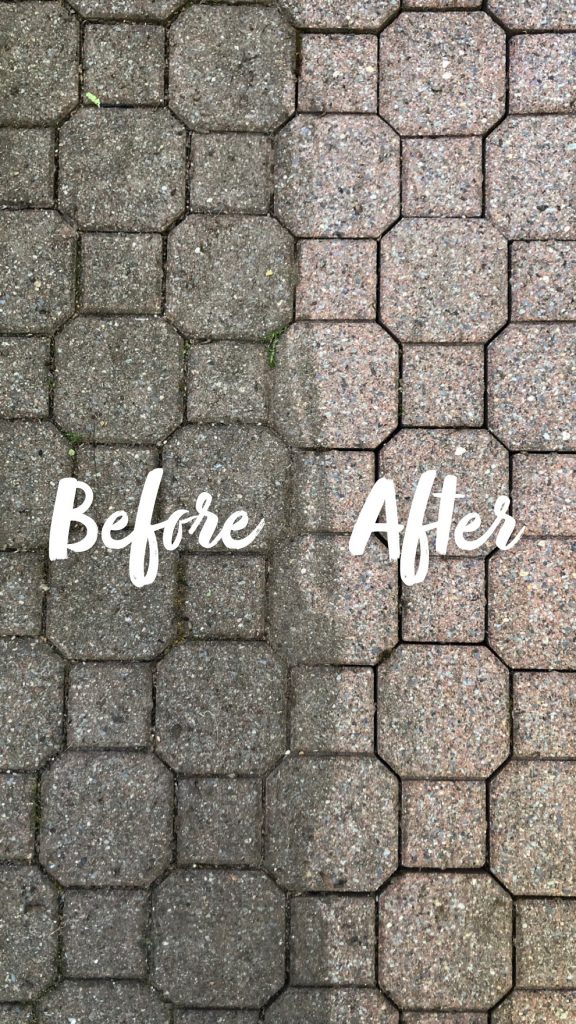
Before beginning the painting process, it’s important to have a clean surface so that the paint can truly adhere to the brick.
The best way to clean the pavers, for us, was power washing. This is because our patio was not in good shape, clearly hadn’t been cleaned in several years, and was in need of resanding anyway.
If your patio is in good shape and is fairly clean, I would not recommend power-washing. This is because it removes all of the sand inbetween pavers, which means you will have to re-sand later on. If this is you, there are special detergents used to clean brick pavers on a low water pressure setting.
If your patio is in need of re-sanding anyway, go ahead and powerwash. A key indication that your patio needs to be re-sanded is that there is nothing visible holding the pavers together, and your pavers have clearly begun to shift around and sink in different places.
To powerwash, you have three options:
- Hire someone to do it – this would cost $150 just for the wash, and more for the re-sanding.
- Rent a power washer for about $79 from Home Depot.
- Do it yourself. We decided a power washer is a good tool to have around, so we got this electric one for about $80 from our local Harbor Freight with a coupon.
Power-wash the day before painting so that it can dry fully. The morning you’re going to paint, give the patio a final sweep for any debris that may have fallen overnight.
Materials needed to Whitewash your Brick Paver Patio:
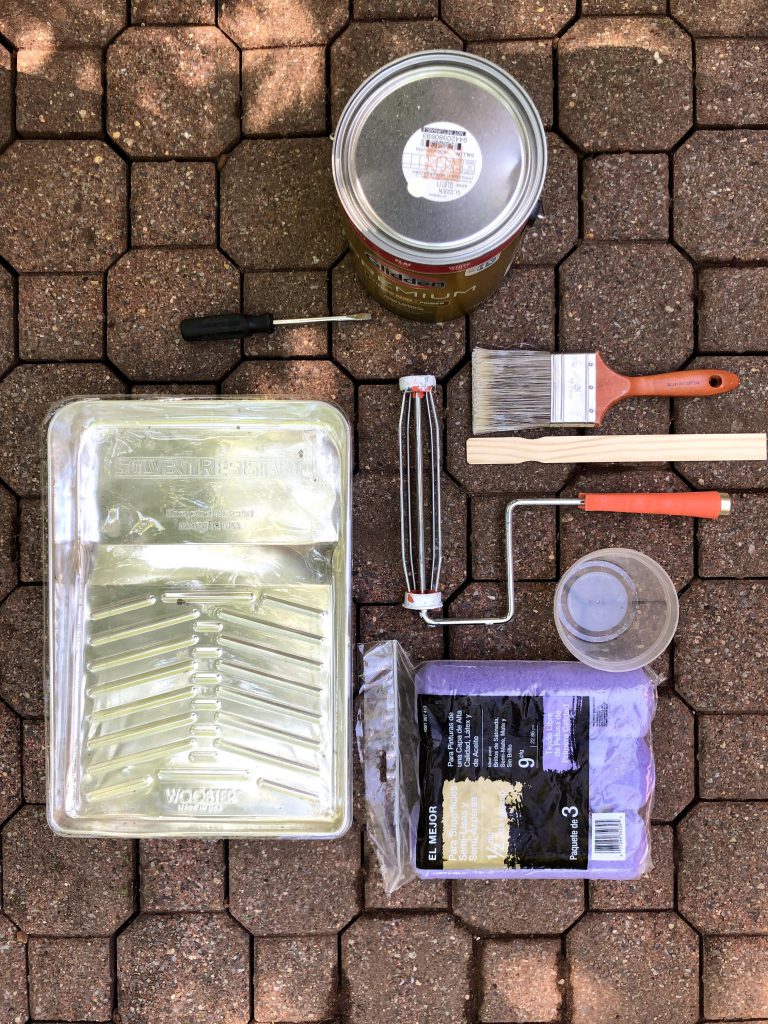
The materials you will need are:
- A paint tray and liner
- Roller naps for rough surfaces
- One gallon of outdoor paint, or more depending on surface area
- Disposable container for measuring paint and water
- Stir stick
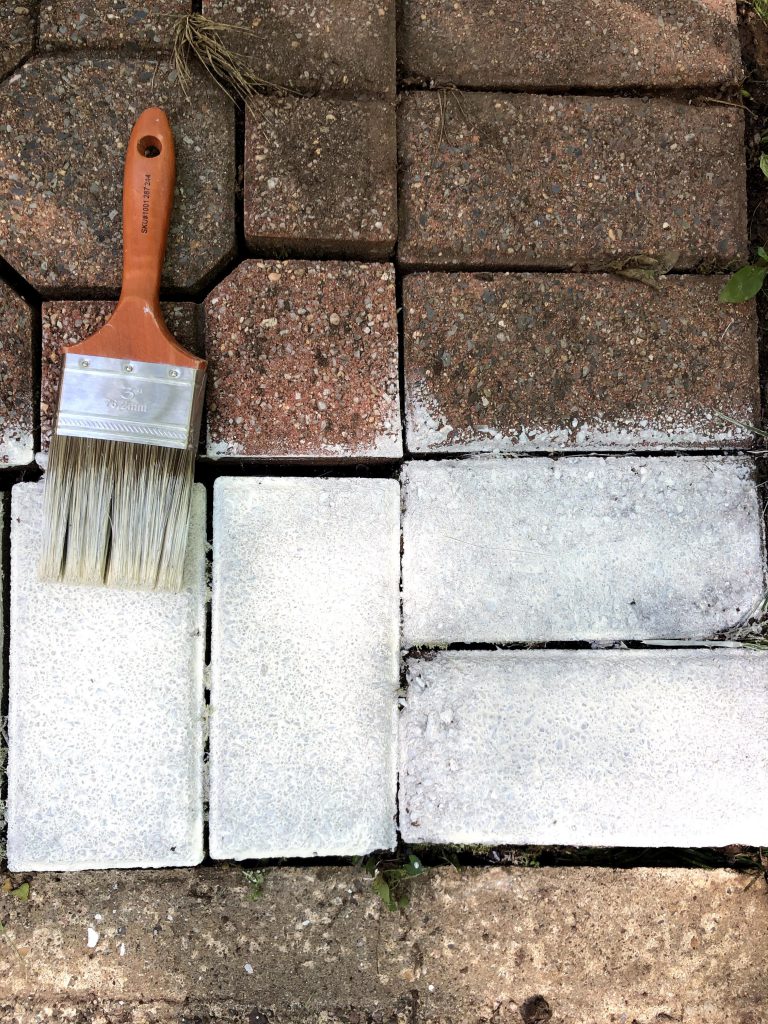
- Paint brush
- Paint roller and pole – I found the pole made the job very easy so that I didn’t have to bend down.
Step 2: Whitewashing
Whitewashing the bricks really is a simple process. Keep in mind that you don’t have to use white paint; you could also grey-wash, or black-wash, or purple-wash – whatever your heart desires! Keep in mind lighter colors reflect more sunlight, while darker colors absorb heat.
The color we used was Glidden’s Horseradish – picked mostly because my husband thought the name sounded funny. This color had a yellowish tint and it still turned out very bright white on the bricks, so I would recommend a cream or beige color rather than a stark white.
For our patio, I decided on a half-and-half mix of paint and water. You should play around to see which ratio produces the look you are happiest with.
Because the paint is permanent once you start, experiment with different ratios before applying to the whole patio. Test different ratios, starting with less water and gradually adding more, on a spare brick paver. If you don’t have any extra brick pavers, you can buy them for about a dollar each at a home improvement store.
I measured out the ratio for the paint by pouring equal numbers of scoops (with an old takeout container, anything works) of paint and water into a larger bucket. I mixed in the bucket, then poured out into the paint tray.
While painting, be sure to stir the mixture regularly, as the paint is heavier and tends to sink to the bottom.
We used thick roller naps for rough surfaces. Using a roller with an extension poll makes this job super quick; it only took me 2-3 hours, with a lunch break in the middle.
I found that having a well-loaded roller and pressing very lightly on the brick gave a much better result, as it was more uniform but also looked sponged-on. When I had to press harder with the roller, it left lines that were harder to blend away.
Throughout the process, keep a paintbrush handy that you can use to blend any harsh lines that do appear. The paintbrush is also useful for covering any bricks that touch the sides of your house.
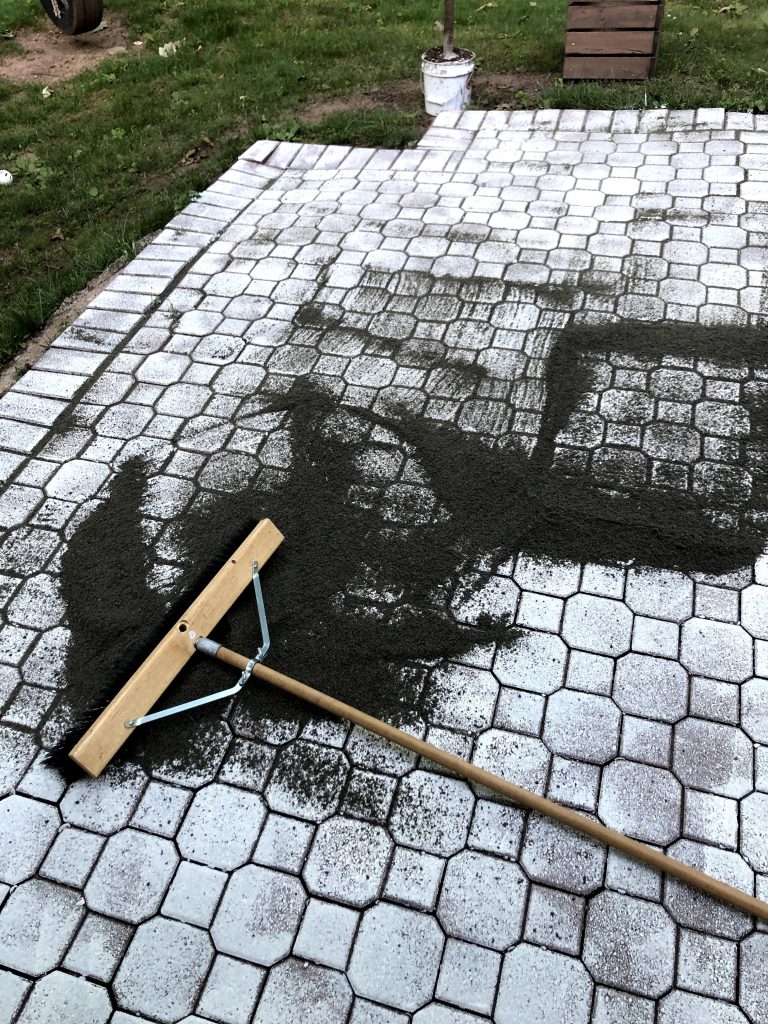
Step 3: Resanding
If you did not power wash your pavers, congrats, you can ignore this step! Pat yourself on the back, you’re done!
If you did power wash your patio, like we did, it will need to be resanded. Don’t be intimidated; if you can use a broom, you can re-sand your patio.
When you go to the hardware store to get paver sand, you will be presented with two options: Polymeric sand and leveling sand.
The polymeric sand is a more expensive option that hardens when water is applied, locking your pavers in place. While it’s a great product, this is typically only used on new patios. If your pavers need re-sanding, chances are they aren’t perfectly level or aligned, and thus the polymeric sand would be a waste of money.
So, since you are at this point in the tutorial, I’m assuming you are using the regular leveling sand. Look for the bag labeled “step two” or, “for use with interlocking pavers.”
The application process is incredibly simple. Pour the bag onto your patio and spread it around with a broom. That’s it!
I’d advise you to wait for it to rain, then see if it needs any more sand. The sand may settle in the cracks and reveal more gaps that need to be filled after a week or so.
Total Cost
So, what was the total cost for this project? These numbers are based on our 450 square foot patio.
- Paint – $29.98
- Roller Covers – $3.32 for 3
- Paver sand – 4 bags at $5.98
Keep in mind that we already had other painting supplies, including a bucket, the paint tray, a paint brush, and the roller and extension pole.
So, the total cost was… $57.22. Not bad at all for something that so dramatically changed the look of our patio!
If you take on this project, let me know what color you choose and how it turned out! Leave a comment with any questions – I would love to help you succeed!
This is exactly what I am looking to do to our pavers. We have similar ones, except they are gray. We are in Florida and have a pool. I am wondering if they will hold up against the rain and elements? I think I might give this a whirl…if it doesn’t work out then I will just have to replace them. But it’s worth a shot, and for the price why not? How are they holding up?
Hi Janessa! I apologize for my delayed response, it has been a busy summer without much time for maintaining this blog. I painted my pavers over a year ago and so far they look the same as the day I did it. I haven’t noticed any peeling or weathering, other than needing to re-sand which is typical. So I would say they have held up well in our NJ climate! I’m not sure if the chlorine from your pool would affect them, however. But, just as you said, it’s a very cheap upgrade and if you are able to afford replacing your pavers eventually anyway I would say go for it!
I too was curious to see how they’ve held up. We have a home in Arizona we’ve just purchased and it has pavers galore under covered patio and out near the saltwater pool. We may give it a shot.
Wow! That’s a great before and after you have there of your brick paver patio. Love the outcome, too!