Disclosure: This post may include affiliate links through the Amazon affiliate program or other affiliate partnerships. If you click on a link and buy something, I may receive a commission, at no additional cost to you. You can read more boring disclosure details in my disclosure and privacy policy.
If there is one element of decor that gives your backyard a warm and inviting atmosphere for entertainment, it’s string lights.
This can be string lights of any kind – canopy lights, fairy lights, edison bulbs, regular Christmas lights – it really doesn’t matter. Any bit of added soft light will elevate your backyard to a space where people will want to keep hanging until you need to kick them out 🙂
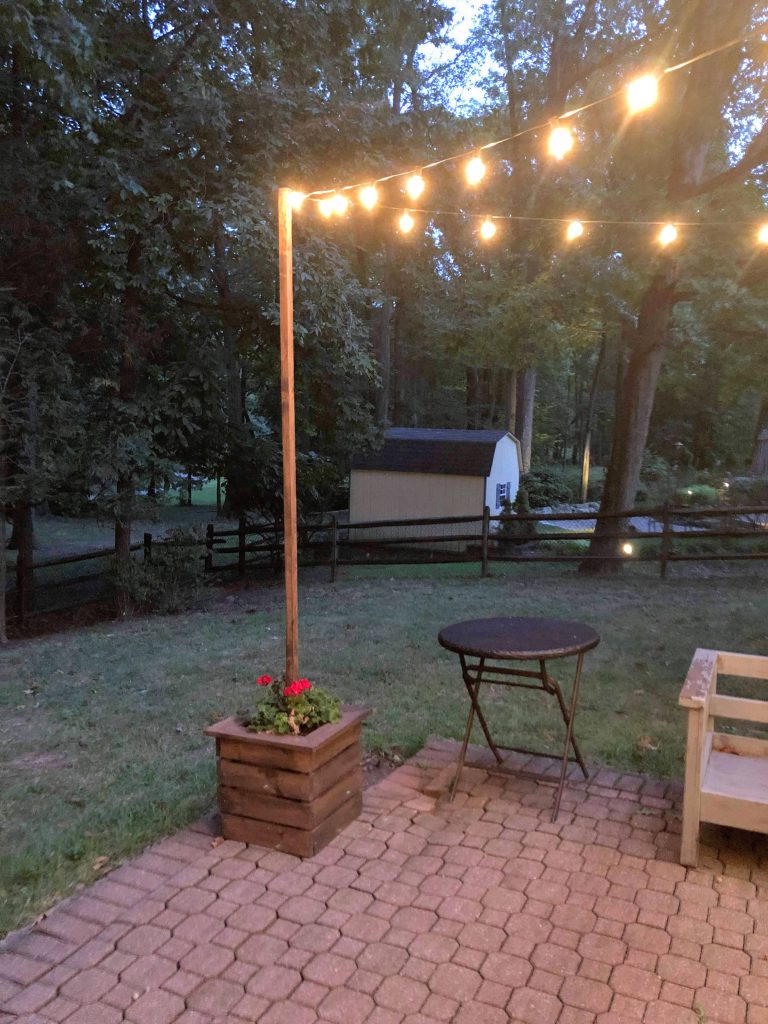
Once we moved, we needed a new system for our lights. Our new house has a huge patio that overlooks a woodsy public park – perfect for entertaining! But, unless we only wanted lights along the back of the house, and due to the lack of conveniently-placed trees, we needed something tall for the lights to connect with.
I saw the DIY string light post tutorials all over Pinterest, and it seemed like the perfect solution to our problem! Now, out of the sea of tutorials, which was best?
Many tutorials involve buying large barrels, mixing cement, and sticking a post of wood into the cement. But after some price shopping, I discovered those large barrels cost over $50 each. And honestly? I thought they were kind of ugly and not worth the money.
Many of the other tutorials involve building your own planters out of wood. I liked the look of these much better. Also, I have a lot of ambitious future woodworking projects in mind for the home, and I figured this was a great, low-risk beginner project. So, after convincing my husband, we dove in head-first!
You might also like my DIY Outdoor Couch tutorial if you are in the middle of transforming your backyard space!
Building the DIY Planters
For the wood planter boxes, we chose to follow Tabitha Blue’s Outdoor Planter Boxes plan on the Fresh Mommy Blog.
Head over to her page for information on the materials and the cut list. But, keep in mind that we discovered some parts of her tutorial that were incorrect.
If you want to build these same planters, I would recommend reading my post first so you know what to expect and do differently, then head over to Tabitha’s post for the plans. Then, come back here to read on how we secured our light poles in cement – we did this differently than Tabitha’s tutorial.
This post will detail what we learned, what we would have changed, and what we think worked well.
Buying wood for your DIY String Light Poles and Planters
We went to get our wood at a big box home improvement store. Now, while it may be cheaper at a lumber yard, we live in NJ, and I am unaware of any lumber yards nearby.
We followed Tabitha’s wood list almost to the T, with the exception of the 4×4’s. They looked like huge tree trunks, and we didn’t think we needed something that heavy-duty, so we opted for 2×2’s instead. Was this the best decision? Read on for that discussion.
The total for the wood only for three planter boxes came out to over $150. Keep in mind this was untreated wood, and treated wood (which many people use for outdoor projects) would be even more expensive.
So was this project cheaper than the wood barrel projects? No, definitely not. Do not go into this thinking it is the cheap way out. Am I still glad we went the wood route? Yes, because I think they look much better than the barrels.
If you’re looking to save some money on the wood for your DIY String Light Poles, you may want to look into tutorials that use 2×4’s instead. Tabitha’s tutorial uses mostly 1×4 common boards, which are found in a different section of the store with uncommon wood sizes and are actually more expensive.
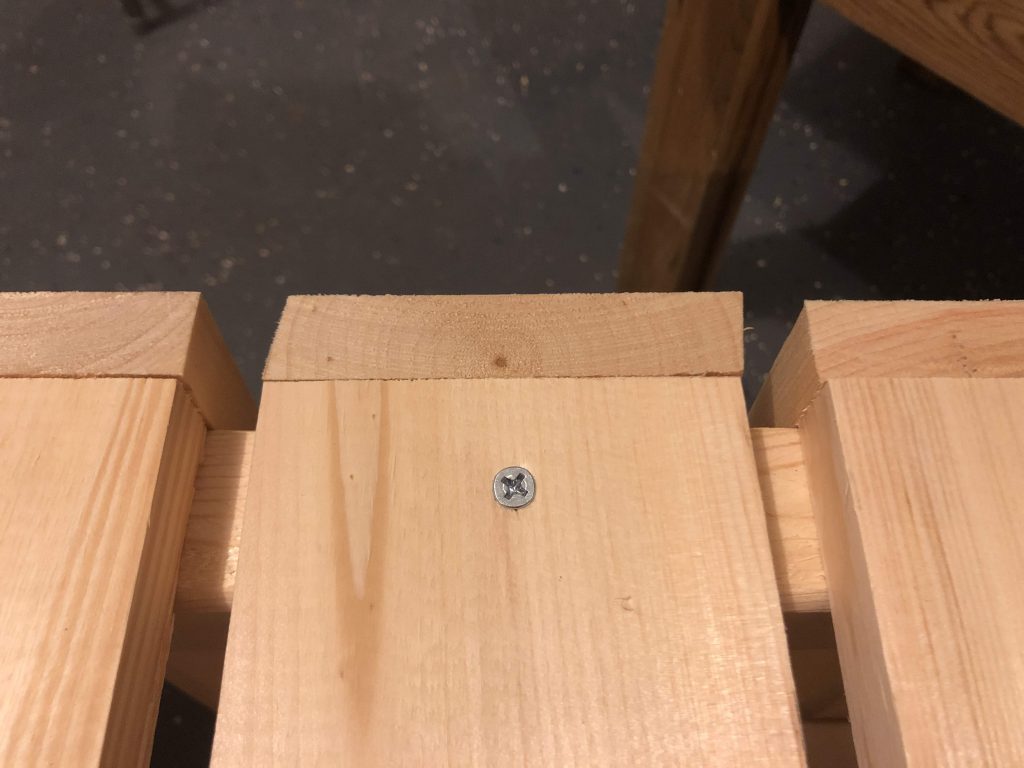
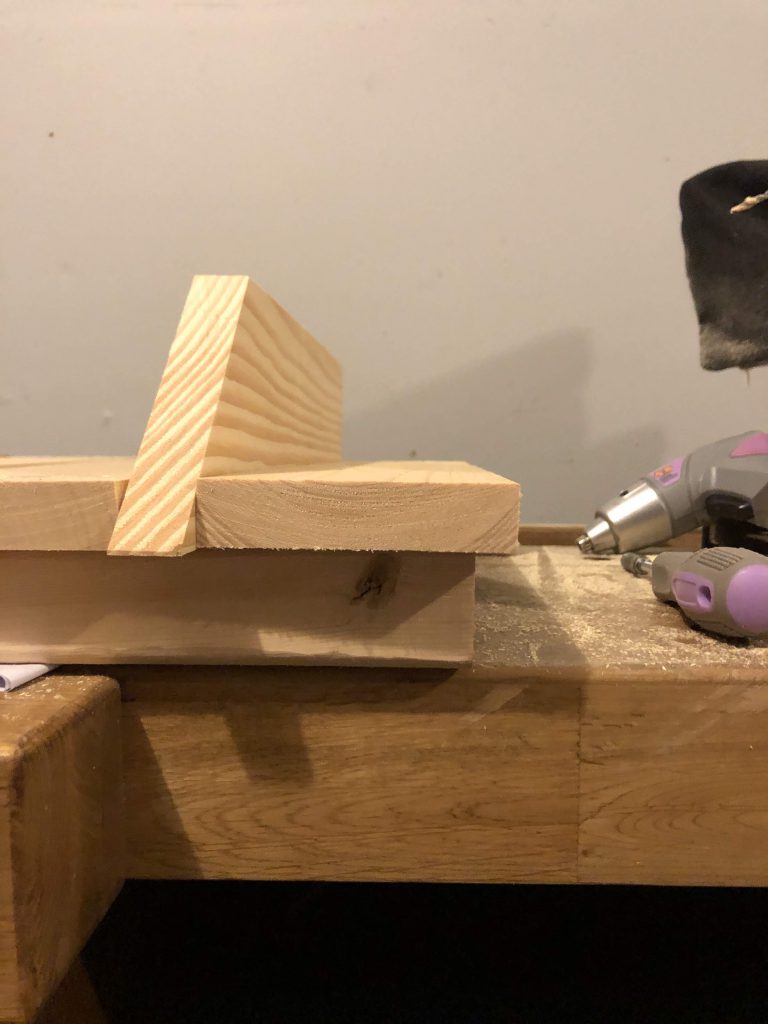
Also, when buying your wood, be sure to get boards that are cut with perfect 90-degree angles. I realized after assembly that I bought some that were kind of wonky (see the picture below)
Cutting the Wood for the DIY String Light Poles and Planters
The cutting of the wood for this project really was very simple. I used a miter saw with a clamp as a stopper to cut the same sized boards every time. This made it really easy to square up, and the cutting of the wood for three planters took me no more than two hours.
This is the miter saw we have – I have used it on every single DIY project this far, and it is a great budget-friendly option.
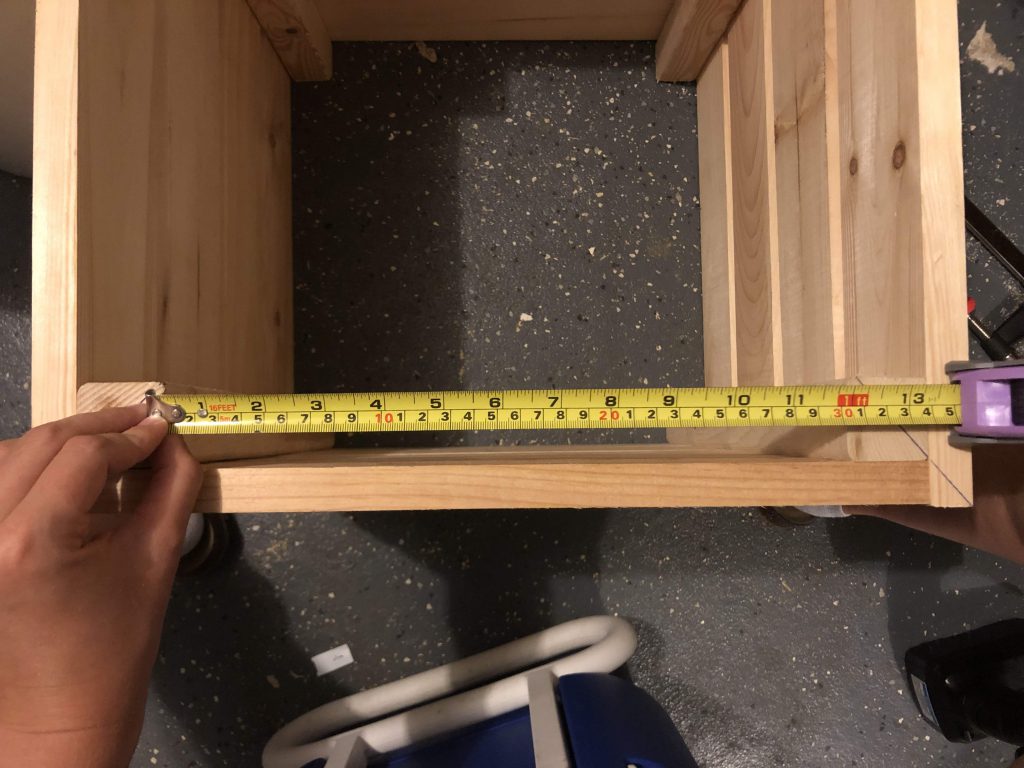
However, I did run into one issue. Tabitha’s tutorial says to cut four 16 inch pieces for the top, then to make a 45-degree angle cut. I did this, and they ended up being too short. It was a big waste, unfortunately. The correct measurement for the inside corner of the 45-degree angle is 12 1/4 inches.
Constructing the DIY String Light Poles and Planters
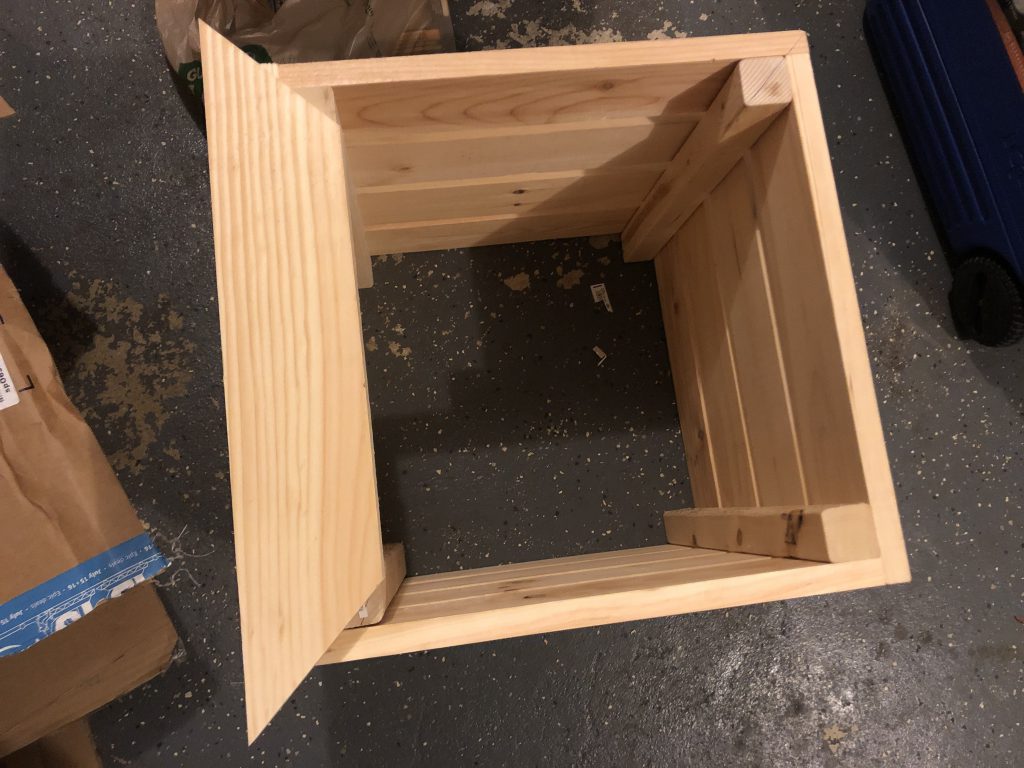
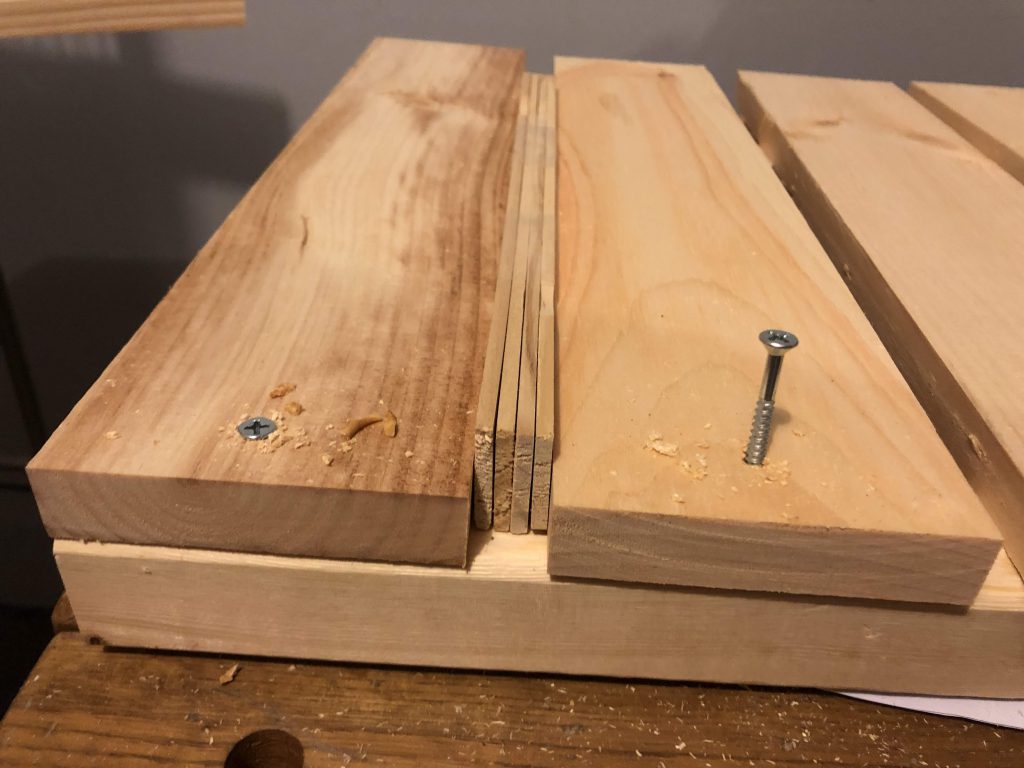
In Tabitha’s tutorial, they recommend using one of the 1×4 boards as the spacer between the 1×4’s that make up the sides. (Look at her tutorial to see what I’m talking about.) This is another part of the tutorial that is incorrect.
If you use the 1×4 as a spacer, you will not have even spacing throughout. The last board will end up being much closer to the previous board because there is not enough room on the 2×2 for the width of 4 1×4’s with a 1×4 as a spacer. See the picture below to see what I mean:
I found that the perfect amount of space was four paint stir sticks taped together (random, but effective). Alternatively, you could do the math and cut your 2×2’s slightly longer than the tutorial.
Attaching the Wood String Light Post
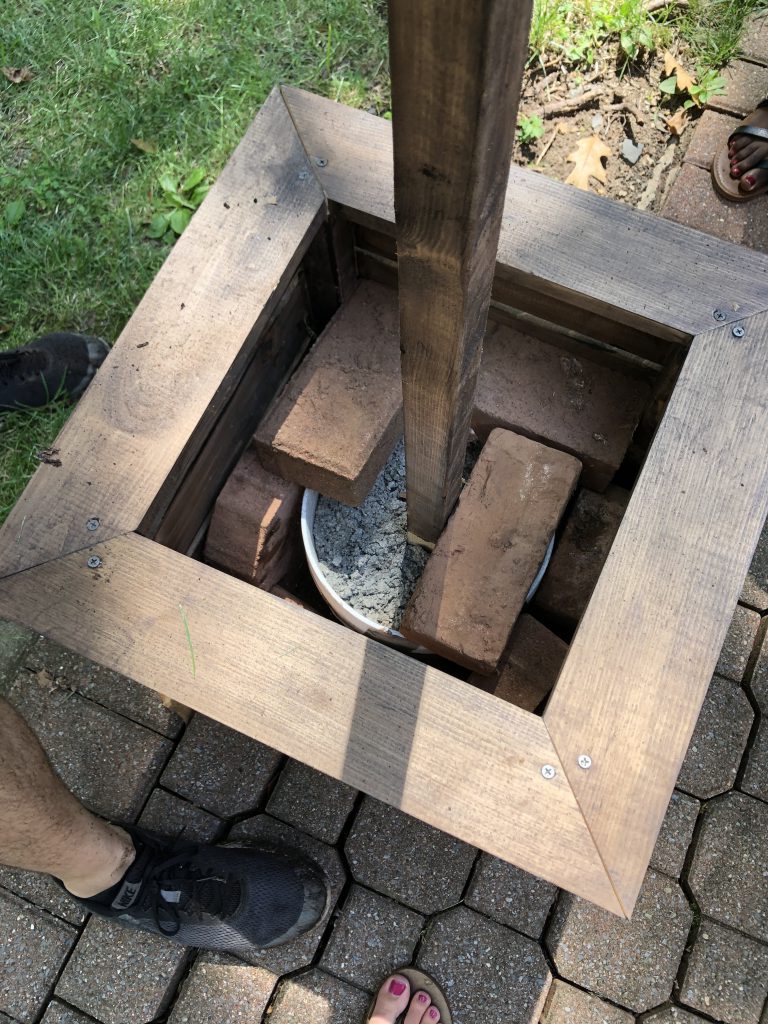
In the original tutorial, they attach their 4×4 to the frame of the planters by bracing it with a cut 2×4 and then filling the empty space with limestone pavers.
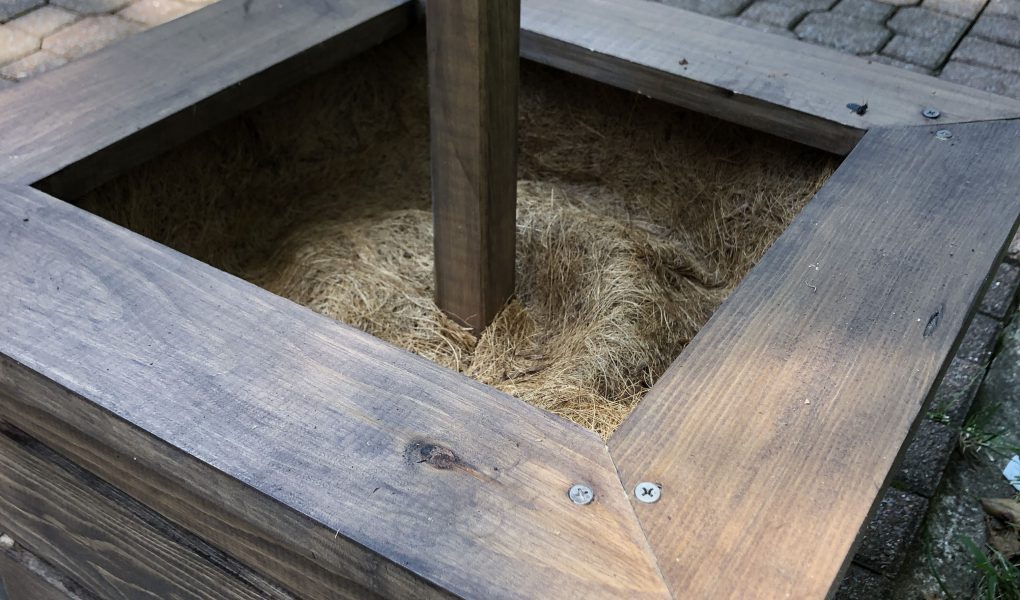
Instead, we chose to follow the methods of tutorials that use concrete-filled buckets, like this one. We did this because we wanted to be able to disassemble the box by taking the pole out of the planter and store them away. I just don’t trust the harsh NJ winters not to destroy all of my hard work.
We cheaped out on the buckets and decided to get 3-gallon buckets rather than 5-gallon buckets. We figured it would be fine because we were using 2×2’s instead of 4×4’s for the posts. This was foolish thinking! The 3-gallon buckets plus the 2×2 posts was simply not enough weight to keep the post from tipping over once the tension of the hanging lights was added.
We solved the solution by putting some random bricks that we found in our shed on top of the bucket. If I were you, I would definitely plan on using a 5-gallon bucket to fill with concrete. It’s worth the extra six bucks!
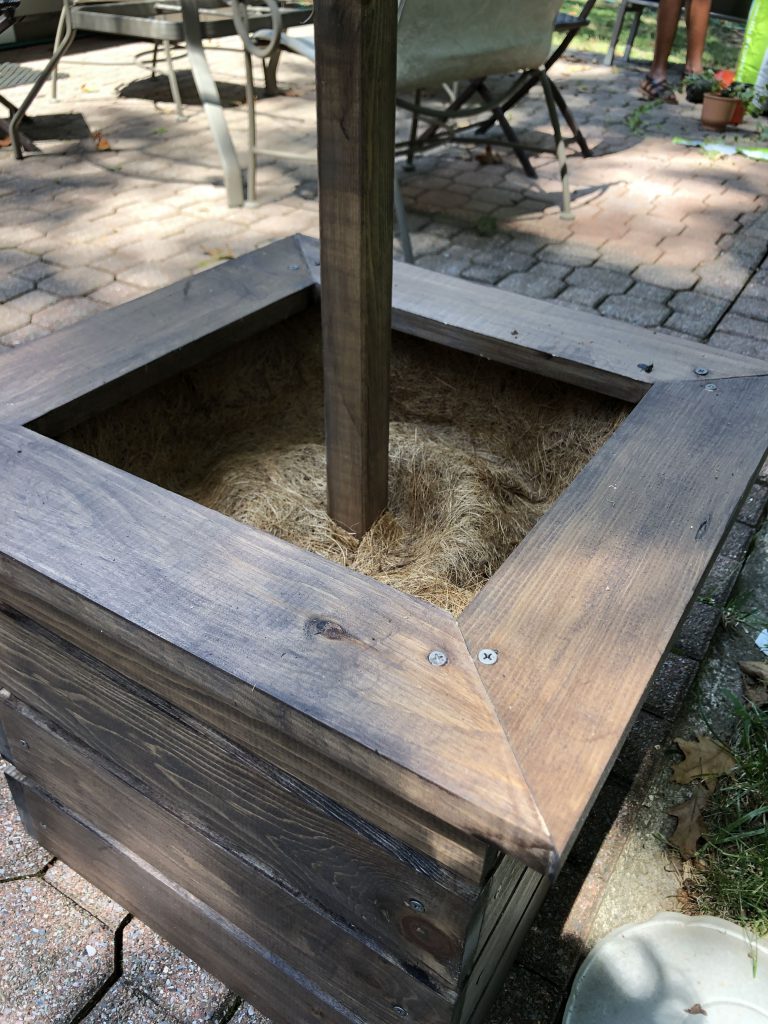
Staining the Wood Planters
My biggest regret, by far, is that I chose to stain the planters after assembly as they did on the Fresh Mommy Blog. It was nearly impossible to prevent drips, and it was very time consuming to get the stain inside all the little nooks and crannies of the box.
I would strongly recommend staining all of the wood before assembly, even if that means you have to stain 32 small 1×4 planks. It’s worth the headache for a more professional product in the end!
Keep in mind that you will probably need to apply two coats of stain to truly weather-proof the planters.
After staining, we screwed in hooks at the top of the 2×2 pole.
Assembly of the DIY String Light Poles
After the planters were built and stained, and the light poles were securely set in their concrete, the assembly was simple.
As I mentioned earlier, we weighted down the buckets and filled the empty space around the bucket with some old bricks. Next, we used the planter liners that Tabitha’s blog recommended.
The planter liners really did work amazingly well. I cut an X in the center so that it would slide down over the light post. The edges of the liner tucked neatly under the decorative rim of the planter and are completely hidden from sight. The bricks also gave the liners a nice platform to rest on.
All that was left to do was plant some pretty flowers in our planters and hang the lights!
Hanging the String Lights
Commercial Lights
When we first started this project, we had these commercial-style lights. Commercial lights are heavier with thick cords, and are supposedly more durable.
Because we had the heavier style lights, we initially tried to follow this tutorial by Blue I Style. We found that the materials used in this tutorial (mainly the wire and turnbuckle screws) were very expensive (about $100 not including the lights).
Installing the wire also took us a solid two to three hours, and that was on only half of the patio. After doing half of the wire, we decided to test out how the lights would look.
Remember how I mentioned that we went with the skinnier wood posts and smaller 5-gallon buckets? Well, this ended up being a huge problem with the heavier, commercial lights. When we hung them on the wire, they were so heavy that they looked just… saggy.
Ultimately, we realized the commercial style lights are not ideal for use with light poles, because the light pole may tip over under the weight of the lights. I would recommend commercial style lights if you are hanging them permanently between two solid structures, such as between your house and your garage or shed.
Regular Lights
We went with these instead, which are much more cost-effective, lighter, have amazing reviews, and have held up well for us.
Because we were now working with lighter string lights, we didn’t do the tension wire on the second half of the patio. Instead, we simply tied a knot in the string to hold tension around the hooks.
So, half of our patio has the tension wire, and half does not – a true experiment. The lights have now been up for many terrible storms and wind, and both sides have held up equally well. So, I would recommend forgoing the wire to save time and money, especially if you plan on taking the lights down every season as we do.
We also used these hooks to attach the strings to the siding on the back of the house. The final nerdy touch is this smart plug, which my husband loves to use to tell Google to turn on our lights.
Update 2/10/21: We left the lights up this winter and they have survived 3 snowstorms, including a blizzard with significant wind. We feel confident that the knot technique and siding hooks are sufficient to hold the lights up.
Be sure to follow me on Instagram for exclusive home improvement project updates!
The Main Takeaways for your DIY String Light Poles
So, after much trial and error, what did we ultimately learn that you should take away from this post?
- Barrels are just as expensive as building your own planters, or possibly cheaper.
- The measurements on the original tutorial are not perfect, see specifics above.
- Stain the wood before assembly.
- Do not skimp on the light post itself or the bucket unless you have bricks to weigh it down.
- Commercial style lights are probably too heavy for light poles.
- Wire and no wire work equally well for hanging lights.
I hope this post was helpful to you if you are considering building your own planters or light poles. In the end, I’m sure you will have a product you love and are proud of. I know we do!


The concrete should fill about to of the barrel to provide enough stability for the posts. Set planter barrel in place and mix the concrete in the barrel. We filled the barrel with about 8”-10” of concrete to a make a 16”-18” planter.
Thanks for sharing!
How many planters did you end up making? how much did the whole project cost you?
Hi Marissa, thanks for your comment! We made three planters. In all, including wood, the buckets, cement, stain, and other miscellaneous materials, I’d say it cost about $225. The lumber was the biggest cost at $150. Every little thing adds up in the end!
Thanks for the lessons learned! I love the idea of putting the posts in concrete buckets and then sliding a planter over it. Would love to see a wider angle pic of your whole backyard to see how you have the lights attached. I’m debating doing 4 pots and just doing a square with the lights or putting hooks in my siding to attach the lights to the side of the house (but I hate to damage the siding)
Hi Lauren, I’m glad this was helpful! I don’t have a good picture of the whole backyard at the moment, but we have them attached between the siding and the light posts in an X formation. We didn’t want to damage our siding either, so we used these siding hooks . So far they’ve held up through several storms and the tension of the lights without falling! The square is a great idea too though 🙂
In hindsight we’re you happy using 2×2’s instead of 4×4’s?
Yes, because I do think they look better than the 4×4’s. But, now I know that if you use 2×2’s, you can’t hang commercial-style lights, and you need at least a 5-gallon bucket filled with cement.
Ok I’ve looked 3 times but can’t find a straight forward list of all the products you purchased for this project. Can you share?
Hi Serenity, sorry for the confusion! I used these string lights and these hooks to attach them to our siding. We also used this smart plug because my husband is a nerd 🙂
For the rest of the materials (wood & screw sizes, cut list, etc), I’d recommend checking out the original tutorial on the Fresh Mommy Blog as linked in the post. She provides a full material list there!
Hello, you have shared what hooks you used to attach to the house, but not what hooks you used on the actual posts. I went to the original blog, and she doesn’t share either. The pics do not show the hooks on the posts. Can you share what you used please? Thank you! Very helpful blog!!
Hi Becky, I’m glad you found it helpful! The hooks on the posts themselves are standard zinc-plated screw hooks that can be found at major home improvement stores. I’ve linked an example here for you. I hope this helps!
Thanks for the great post! How far apart were your stands from each other? I’m starting a similar project tomorrow, and at my widest distance I’m 23′. I’m wondering if I can stretch them that distance.
Hi Frank! Ours are about 15 ft apart from each other, but each light string stretches in an x pattern (one line diagonal from the plug on the side of the house to the light pole, one to the light pole in the middle, and then another diagonal line to a different point on the side of the house). You’ll have to figure out what pattern works for your space, but it should definitely stretch 23 ft 🙂 Sorry for the late response, I hope your project is going well!
Plastic/resin large planter that you see in garden stores can be filled with concrete and the pole inserted before the concrete has cured. I think this would have an elegant look on a front of house patio. I am looking for ideas.
Sure, feel free to do that at your house! This is a tutorial for building the planters out of wood if people prefer that look.