
Disclosure: This post may include affiliate links through the Amazon affiliate program or other affiliate partnerships. If you click on a link and buy something, I may receive a commission, at no additional cost to you. You can read more boring disclosure details in my disclosure and privacy policy.
This post is a full tutorial for the DIY Outdoor Farmhouse Table plans as featured on ana-white.com.
We’ve been working on this table since the end of April, but we’re finally done! Projects like this take forever because I’m only able to work in small, sporadic chunks during nap time, but we did it!
All the hours of sawing, sanding, and screwing were worth it because we have a beautiful DIY outdoor farmhouse table that we hope will last for years to come.
The plans for this table are not mine. You can find the plans here; the credit goes entirely to the blogs of Ana White and Shanty-2-Chic.
That said, the plans are not particularly detailed. For example, one step of the plan is just, “Build the tabletop and attach.”
This tutorial will explain how we used the plans and all of the steps we took to recreate Ana White’s beautiful table. We learned a lot along the way, so we hope that all of our problem-solving will be useful to you as you build your own table!
Materials & Cost
You can find the exact lumber sizes you need on the plans, but in general, this project cost:
- Lumber – $105 – We got treated pine from Lowe’s. Treated wood is the better choice if your table will be on an uncovered patio outdoors.
- Stain – $40 – The color stain we chose was only available in a one-gallon size. We will be using it on every project from here to eternity!
- Sandpaper – $10 – We used coarse 60, medium 120, and fine 220 sandpaper for this project. We used a lot of sandpaper, but it’s worth it for a quality project.
- Rags & foam brushes – $10
- Screws – $15 – we used a variety of sizes and types, including self-tapping wood screws and pocket screws
On the Shanty2Chic blog, they say they built this table for only $65. I’m not sure where they are getting their lumber that cheap, but I would say $100 is a more realistic budget for the wood, especially if you go with treated lumber.
We decided treated lumber was the best for an outdoor table. There is a misconception that you can’t stain treated wood for at least a year. This is not true, and actually only about a month is needed. If you sprinkle water on top of the boards and it soaks in, it’s fine to stain the wood. If the water beads up on the surface, wait a bit longer.
We used very few tools (each one we used is linked here), including a miter saw, an impact driver, drill, and sander. These four tools are a great investment and we’ve used them on every DIY project thus far.
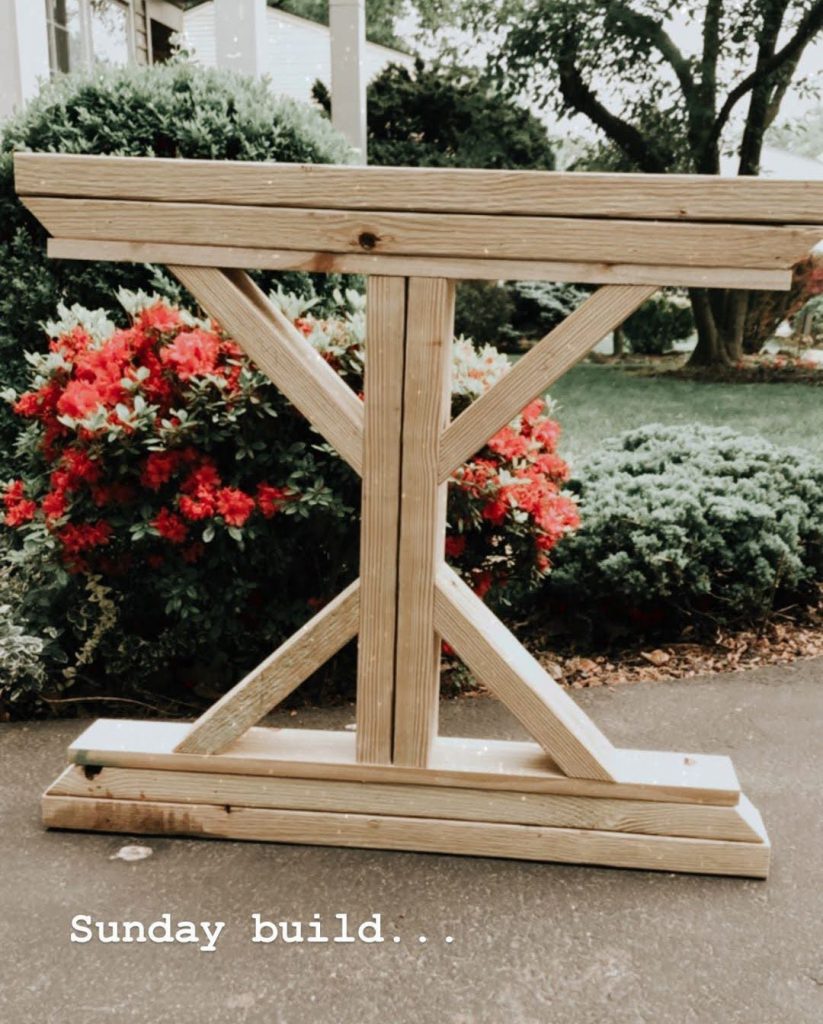
Building the table base
Treated wood is very splintery and rough, so before you begin screwing any pieces together, I’d recommend sanding the edges with a coarse-grit sandpaper, as you’ll be unable to smooth out the edges after attaching. You’ll also want to sand all of the cross braces, as the inside surface will be too hard to reach with a sander after assembly.
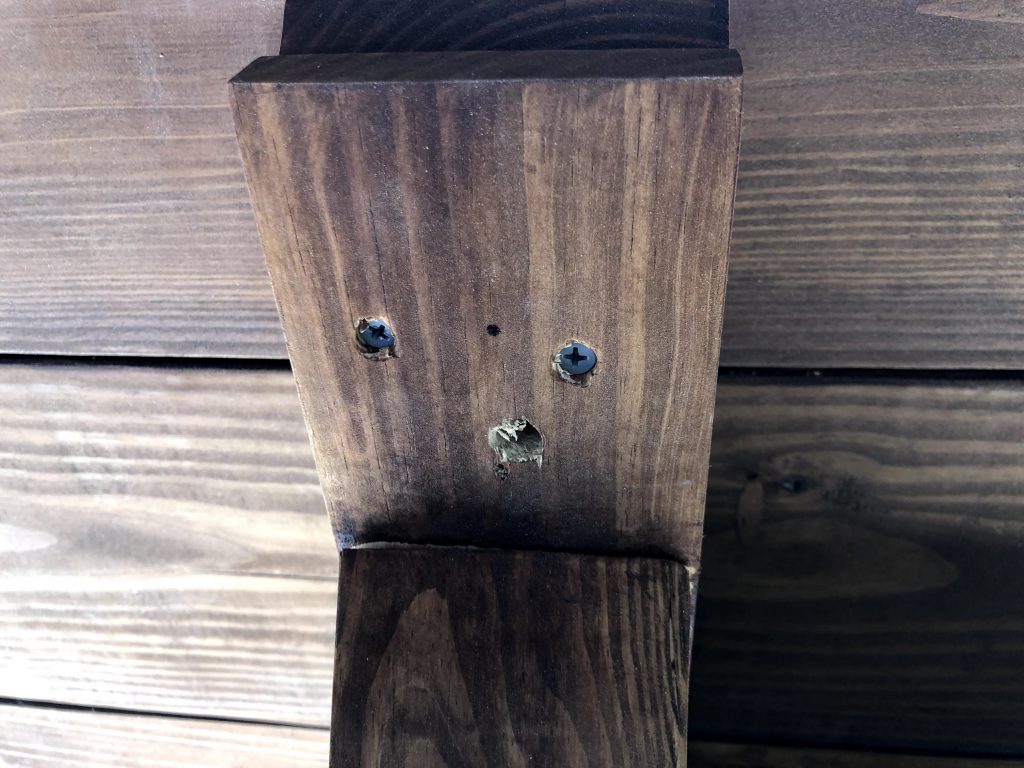
The original plans instruct you to first screw together the two vertical pieces of the ends, then attach the cross braces.
We had a really difficult time holding the cross braces still so that they stayed aligned and level. Instead, we found it was easier to attach the 1×4’s first, which were perpendicular to the two vertical pieces, to give us something to brace the cross braces against.
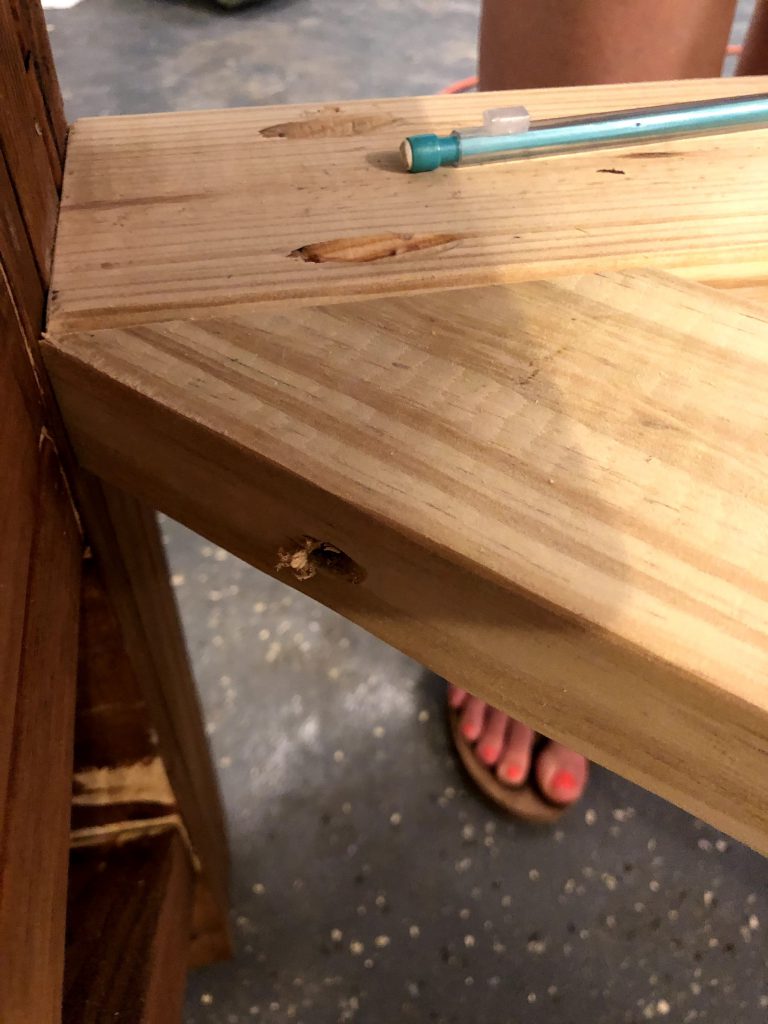
We then drilled diagonally through the surface of the cross brace into the vertical piece (picture below). We were able to cover the screw with wood filler so that it was invisible later on. For this part, we had to use 2-inch screws, which were not listed in the original plans.
The rest of the table legs are pretty self-explanatory, as it’s simply cutting the wood and stacking it on top of one another. We secured each piece of wood with both wood glue and screws.
The original plans call for either a curved piece at the top and bottom of the end, or for both 2x4s to be cut at a 45 degree angle. We actually opted to have the top 2×4 be a clean 90-degree angle, then the bottom 2×4 to be a 45-degree angle. We simple liked the way that look better than both 45 degree angles, but it was much easier than the curved option.
For the long pieces that connect the ends to one another, we attached them using pocket holes. We drilled two pocket holes about 2 inches apart on each end. To avoid any visible screws in the finished product, I first sanded the cross braces with coarse and medium grit, then drilled the holes. After attaching the cross braces, I then filled the holes and finished with fine grit sandpaper.
To avoid having to fill more pocket holes, the larger cross braces were attached the same way as the smaller cross braces by screwing diagonally through the wood into the adjoining piece. It’s probably because the wood we used wasn’t perfectly square, but the correct angle for the cross braces ended up being 47 degrees, not 45 degrees as it says in the plans.
Assembling the tabletop
Just as I recommended with the legs, I’d suggest sanding the edges of the boards before joining them together.
Ana White recommends leaving a gap between the boards for drainage if planning on using the table outdoors. After consulting with a few different people who are not novice woodworkers like we are, we decided it was best not to leave a gap between the boards initially. Let me explain:
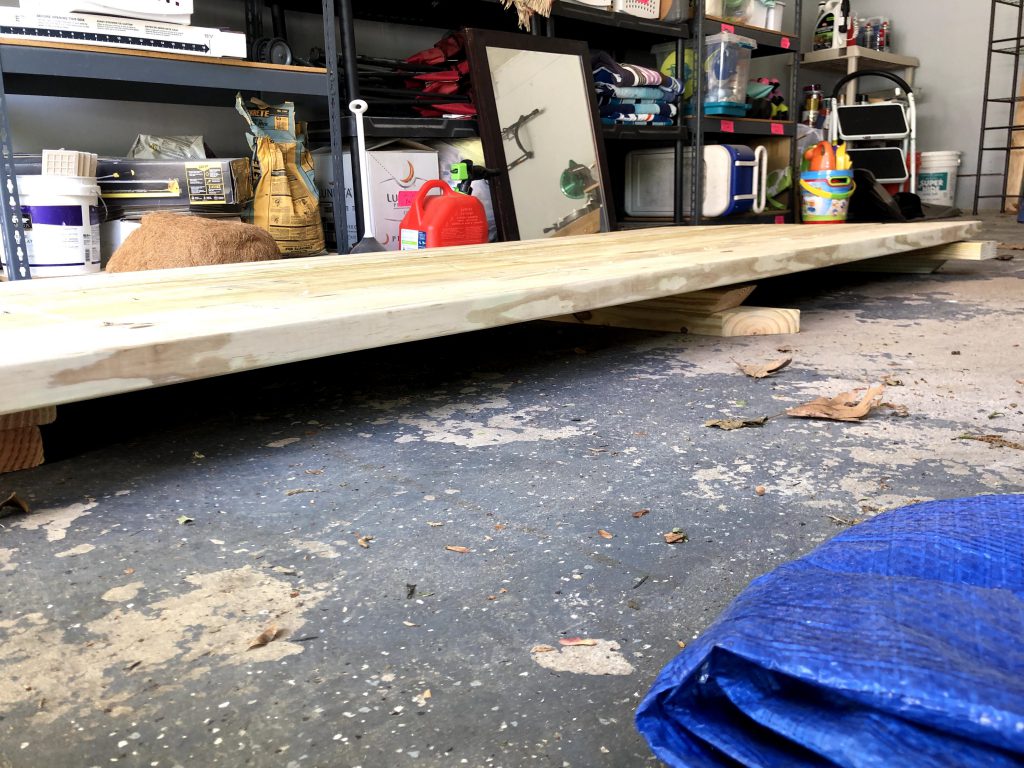
When you buy treated wide planks like 2×10’s, the wood will be very waterlogged. As it dries, the wood will warp and contract. It’s best to build your tabletop when the wood is wet to prevent the boards from cupping and bowing in different directions.
However, because the board will contract as it dries (aka, shrink), if you leave a gap in between your boards from the start, this gap will only continue to get wider as the boards dry out. We decided to join the boards before drying, but without any gap so that it wouldn’t get too wide after it dried.
After joining the boards, lay the top on a few pieces of wood on the ground. It’s important to lift it off the ground so that air circulates as it is drying. However, you want to have the supports at the same height and equally spaced apart so that the top doesn’t sag or bow as it dries.
Joining the boards with pocket holes
While there are other ways to join the boards of this table, unless you want to modify the original plans, you’re going to need to learn how to drill pocket holes.
Pocket holes really aren’t that intimidating, I promise. First of all, you will need to purchase a Kreg Jig. While many advanced DIYers have the Kreg K5 or the Kreg HD, I have the much more affordable Kreg R3, and it works just fine for all boards up to 1 3/4 inch thick (e.g., 2x4s, 2x10s, etc). There are dozens of youtube videos explaining how to use it, but you simply clamp it to the surface you’re drilling.
For joining horizontal boards together, Kreg recommends drilling pocket holes 6 inches apart for the entire length of the board. For an 8 foot table, that’s a lot of pocket holes. Even so, I’d say it took us 1.5 hours to drill and screw all of our pocket holes.
To begin, lay out all of your boards on a flat, level surface (such as a flat driveway or a garage floor). Find the side of the board that you like best, and pay attention to the grain of the wood. Arrange the boards so that you’re happy with the direction the grain of each board runs. A little forethought here will make for a much more aesthetically pleasing end product.
Next, flip the boards over and line them up perfectly. Draw a triangle beginning at the bottom left corner, going up to the center of the top board, and back down to the bottom right. This triangle will help you keep your boards aligned.
Using a ruler, mark where your pocket holes will be, starting 6 inches from the end. Kreg says it doesn’t matter whether your pocket holes are staggered on each board or lined up with each other.
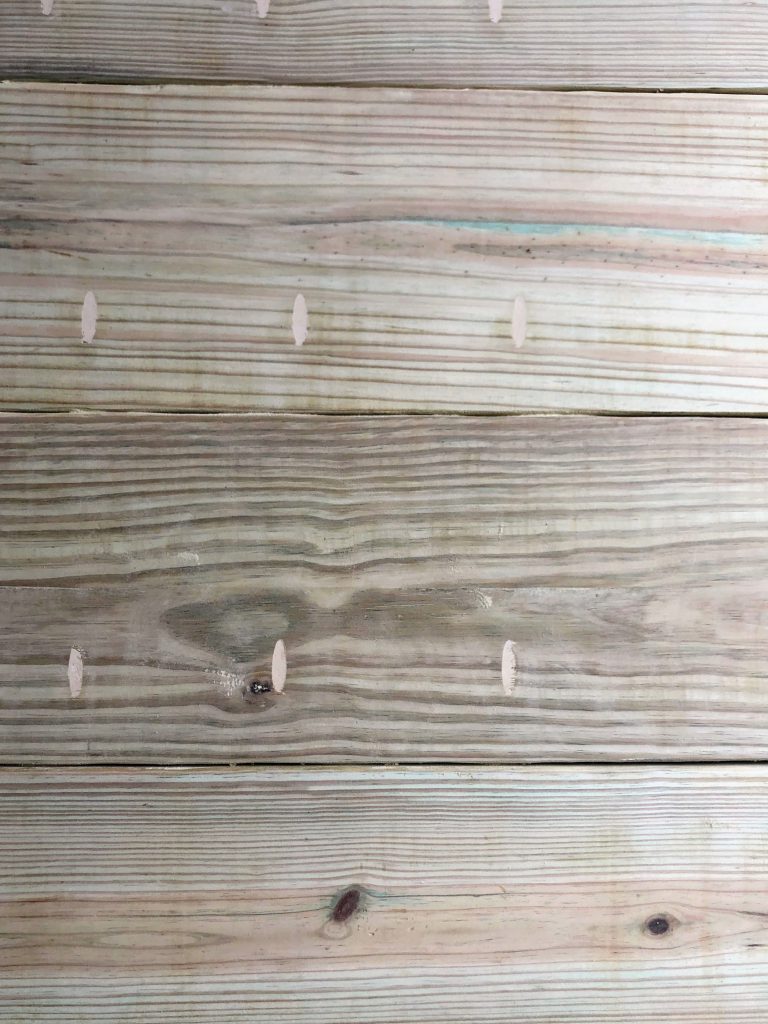
Drill your pocket holes according to the Kreg instructions and attach with pocket hole screws. We made about 40 pocket holes in total.
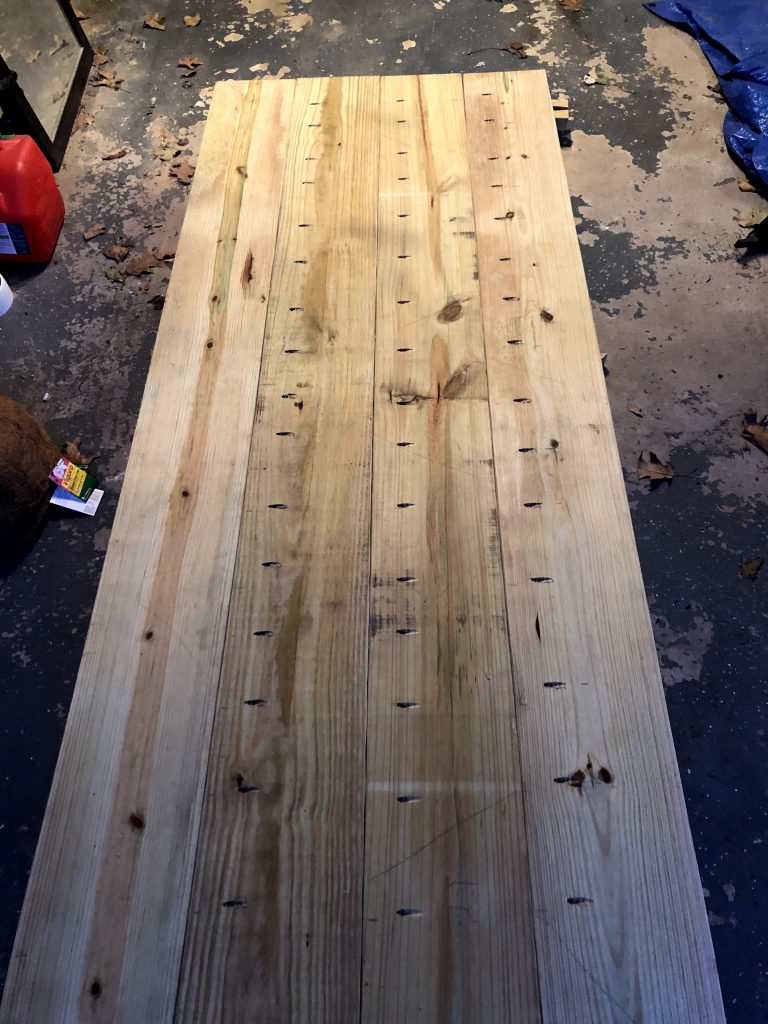
Finally, fill the pocket holes with stainable, sandable wood filler.
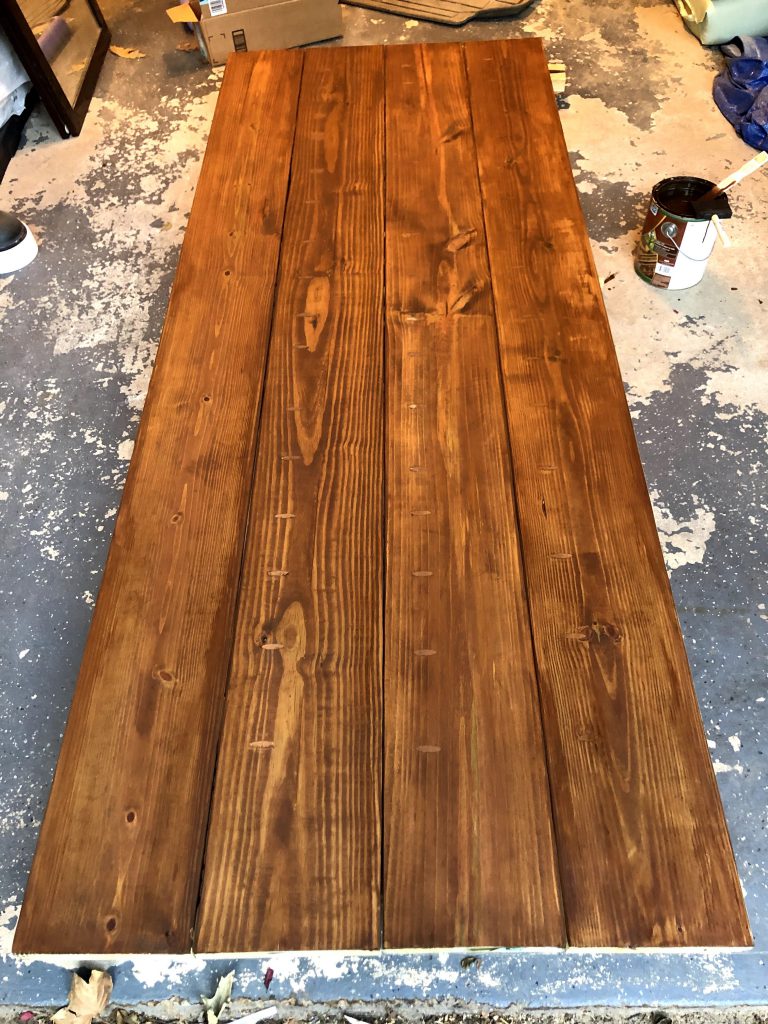
It’s definitely worth noting that this table top is extremely heavy. It will get lighter as it dries, but if you assemble it right after you purchase the wood, keep in mind that you will need people to help you move it onto the drying supports. I injured my back just trying to help my husband move it.
Because it’s so heavy, I decided to sand and stain the underside of the tabletop first, then we had friends help us flip it on to the base to attach before finishing the top.
Attaching the table top
When determining how to attach the tabletop to the base, it was very important to us that we didn’t have any visible screws. In other words, we wanted to avoid screwing from the top down into the base.
Instead, we chose to screw from the bottom up. This is possible using very long screws (4 inches or longer) or by using a countersink drill bit.
Because we didn’t have a countersink drill bit, and didn’t feel like going to Home Depot, we took a large, 1/2 inch drill bit and drilled about an inch into the wood. This allowed us to drive our 4-inch screws further into the wood and gave them more to grab onto. We did this for every screw.
To attach, we first lined up the table to make sure it was as centered as possible. Then, we drove two screws through each corner of the base. Once it was attached at the four corners, we followed the same process with 4 screws up through the center beam of the base.
Finishing
Honestly, finishing (aka sanding and staining) was probably the longest part of this entire project. I kept reminding myself that I was trying to make a nice piece of furniture, and sanding takes time if you do it right with multiple grits.
Just prepare for many hours of sanding. It will give you lots of time to reflect on life. This sander is my trusted friend and has stood the test of time.
I’ve already mentioned a few things about sanding throughout this post, but just as a refresher:
- Before assembly, sand down the parts that will be difficult/impossible to reach, such as the cross braces or inside edges of the tabletop boards.
- Treated wood is very rough and splintery, so sanding is necessary on all parts.
- Start with a course (~80) grit to remove splinters and rough material, then work your way up from medium (~120) to fine (~220) grit.
- Wear a ventilator mask to prevent sawdust from entering your lungs. Eye protection is also recommended.
- Vacuum and wipe down the table with a damp cloth before sanding.
- Sand and stain the underside of the tabletop before attaching.
Just as I recommend sanding before attaching pieces together, you may want to consider staining the inside edges of the boards before screwing together the tabletop. This gap is very difficult to reach with a normal foam brush.
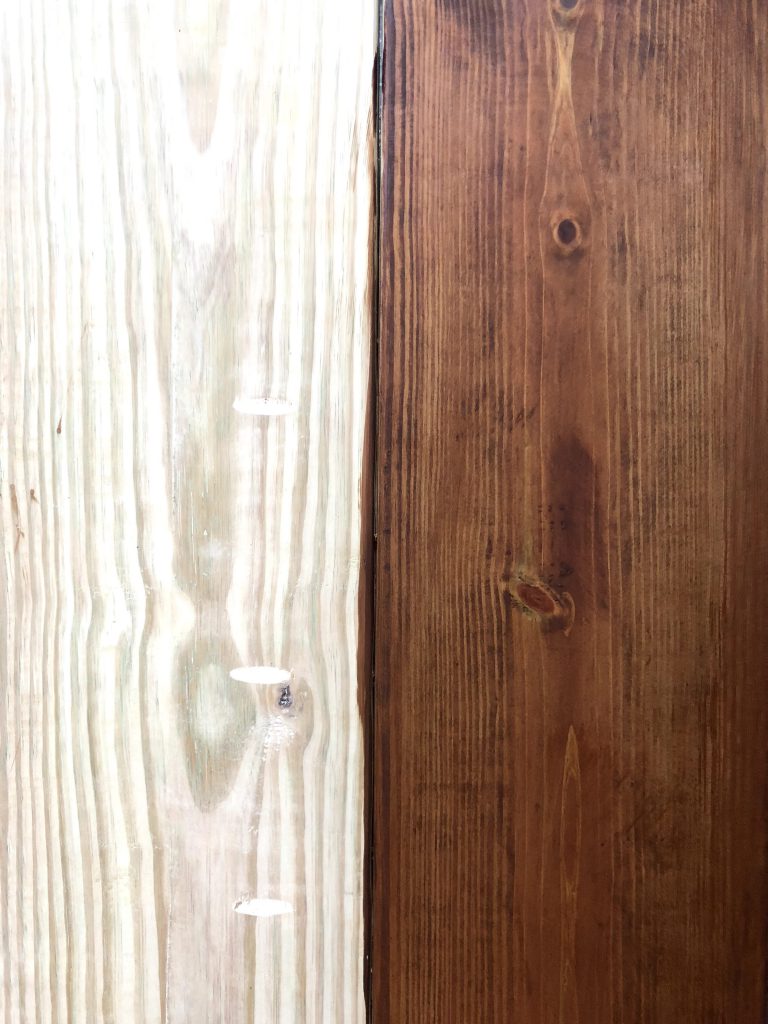
Use a foam brush to avoid bubbles in the stain. After applying the stain with the brush, either let it sit for 10 minutes or so before wiping, or wipe it off immediately with a rag. The longer it sits, the more intense the stain will be. I used a translucent Olympic outdoor stain in mahogany.
Be sure to wear latex gloves while staining, or your fingers will also look like mahogany.
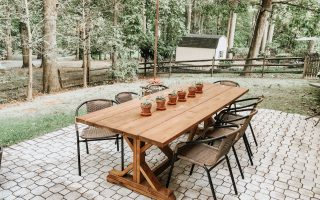
The final product…
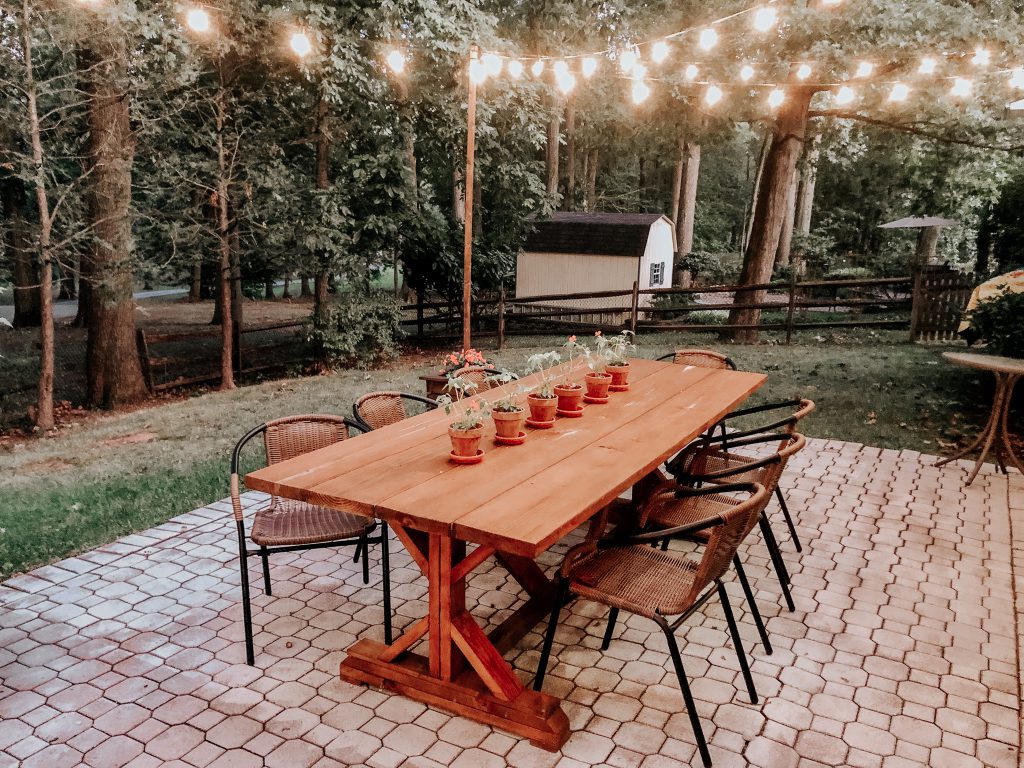


Overall, I am t h r i l l e d with how this DIY outdoor farmhouse table turned out. It was a doozy, and took a great deal of patience to complete as novice carpenters, but I’m excited to have this beautiful table on our patio for several years to come. It will be used to host parties and regular weekday dinners with our growing family!
If you’re interested in the chairs pictured, we got them on Amazon. They were the most stylish chairs we could find for less than $40 per chair, and we’ve found them to be very comfortable. You can get a pack of 4 here.
If you want to add beautiful lighting to your outdoor space, check out my tutorial on these DIY String Light Posts. Or, you may be interested in reading about how we whitewashed our brick paver patio.
There’s nothing more satisfying than enjoying the fruits of my labor, and knowing that I saved money in the process.
If you have questions or experiences to share from your own farmhouse table build, please leave a comment – I’d love to help and hear from you!
Where can I get a copy of the plans for this project?
Hi, the plans are on Ana White’s blog as linked in the post!